This Blog will provide the step by step instruction on how to complete the Drop Shipment flow in Oracle fusion.
Step By Step Guide To Complete The Drop Shipment Flow In Oracle Fusion
I’m Valerie, an order entry specialist with Vision Technologies. For effective interaction and to retain our customers, I need quick and easy order entry.
With Order Management Cloud, I can access all of my information quickly from my tablet or computer. Creating Orders is made simple for me in Order Management Cloud through springboard icons access to tasks that I routinely perform.
[Click on Order Management]

The landing page includes embedded analytics which helps direct me to any critical actions I may need to take.
Creating Orders is one click away.
[Click: Create Order]

I’m taking an order for Computer Service and Rentals.
[Enter Customer Name: Comp]

Type ahead search, allows me to easily find and select the customer.
[Select Customer Name: Computer Service and Rentals]

All other Order Header fields are dynamically populated; allowing me to quickly confirm the Customer Contact and Address and begin entering the desired products.
[Select Standard Item: CM53035 or CM53036] OR
[Select Configured Item: AT1601000]

Adding items to the order is fast and provides immediate visibility of availability.
Default quantity is 1, item price and description populate as I select the items.
We have a sourcing agreement for this product from a local supplier and drop ship directly to the customer.
[Update Quantity if desired]
[Click: Add]

GOP has determined that the item is In Stock. Once I have selected all products for the order, I am ready to submit it for fulfillment.
% Item availability generally comes by calling a quick Availability feature in GOP. When the ATP rule associated to item is “Infinite Item Availability” then the item is always shown as “In Stock”. If the item is set to “Supply Chain Availability Search” ATP rule, availability will be shown based on uploaded Supplier capacity.
[Click: Submit]

User interactive messages advise the result of this action and I confirm.
[Click: Yes]

The order is now being processed and I can quickly view the fulfillment to update the customer on the status.
[Click: Actions]
[Click: Switch to Fulfillment View]

Order line status is also updated as the order progressing.
[Click: Fulfillment Lines Tab]

I have complete visibility on every item ordered.
[Click: Order Line]
[Scroll Down to Attributes]

The order line has progressed to Awaiting Shipping. Next I want to confirm for the customer the supply details.
[Click: Supply Details Tab]

The item sourcing rules have automatically created the fulfillment directly from supplier, Lagring Systems.
Based on the Contract Agreement in ERP Cloud the Purchase Order has been generated with delivery directly to the end customer.
Drop Shipment details make it easy for me to know who sources this item.
[Click: General Tab]
% The generation of the associated Purchase Requisition and Purchase Order is not immediate and may take a few minutes. Click the Refresh button to update the Sales Order information.
% Make note of the Purchase Order Number for easy search in iSupplier Portal.

The Orchestration Process provides visual status of the tasks for this order.
[Click: Order Process Number]

At a glance I can understand the stage of fulfillment, from Scheduled through to Billing. The item is being Procured is Awaiting Shipment from the Supplier.
Now I will change roles to the Supplier who received the Purchase Order.
[Sign Out or Open different browser]
[Sign In as the Supplier who has received the order: lars.swensen/weekly password]

Using ERP Cloud, we have smarter supplier interactions and improved productivity through supplier self-service.
Taking on the Role now of the Supplier, Lars Swenson with Lagring Systems, received the order to process the fulfillment. As a supplier, Vision Technologies makes it easy to collaborate through their supplier portal.
[Click: Supplier Portal]

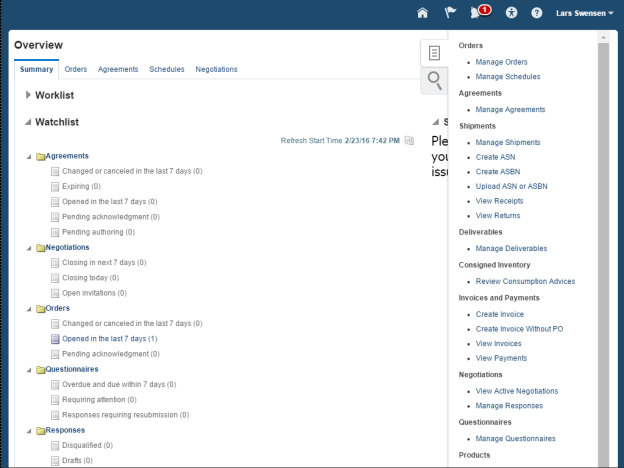
The portal provides access to agreements, orders, schedules and more. We have an agreement Vision Technologies to source Visio racks and ship the server racks directly to end customers for Vision Technologies.
We received an order earlier today.
[Click: Orders]

The recent activity provides instant access to current orders organized by status making it easy to use and respond. I can review the order details in a single click.
[Click: Purchase Order]

The order clearly identifies the shipping location is a third party.
[Hover: Info Icon]

The customer name, address and contact were sent directly from the sales order, ensuring delivers to the correct location.
[Click: Customer, Click: Done]

We have stocked supply for this order and ready to ship.
% If you added the configured item, you may want to scroll down and show that the detailed configuration is passed to the supplier on the PO.
[Click: Done]

It is a simple task to notify Vision Technologies immediately of the shipment.
[Click: Tasks > Create ASN]
Orders come directly into our system based on the agreement. Flexible search options allow me to easily find the order that I am ready to process.
[Enter: Purchase Order Number]
[Click: Search button]

I select the purchase order line that I am ready to ship and send the shipping notice to Vision Technologies.
[Click: PO row]
[Click: Create ASN]

Only a few details are required to send the shipment notification. Other fields provide the option for more extensive shipment details.
[Enter: User Defined Shipment Number and any other desired shipment content]

Interactions are made simple from this intuitive user interface.
[Enter: Line Quantity: 1 or quantity ordered]
[Click: Submit]

The information is validated and the customer order progresses.
At this stage, the system creates an invoice for the drop shipment, which is electronically sent to the customer.
[Click: OK]
[Sign On as the Receivables Specialist, Tracey Allen or open other browser session if you elected to use different browser earlier]

Switching roles to the Receivables specialist, we will now show the invoice from ERP Cloud.
I’m Tracey Allen from Accounts Receivable. Processing invoices accurately and on time means steady cash flow.
When orders are shipped, we need to bill the customer promptly, so that we can recognize revenue and collect payment.
% The Import Receivables Transaction Using AutoInvoice must run before invoices can be viewed. If this was not scheduled, submit the process before showing the following steps.
[Click: Receivables]

An important part of the Order to Cash process is actually sending the invoice to the customer, so that we can collect payment. The shipping transaction automatically sent ERP a transaction with the information required for invoicing.
This allows us to efficiently process invoices with reduced risk of billing errors.
I can verify invoices in a snap using my springboard with intuitive groupings of icons.
[Click: Billing]

The tasks I perform are easy to access.
[Click: Tasks]

Invoice transactions are at my fingertips.
[Click: Manage Transactions]

Common search criteria make it easy for me to filter and find what I need.
[Enter: Transaction Date=Current Date and Reference Number=Order Number]
[Click: Search]

Today’s invoices are immediately displayed. The invoice was automatically created in ERP Cloud based on the order and shipment information in SCM Cloud. To view more details, I simply select the invoice.
[Click: Transaction Number on the row with your customer order]

All details for the invoice were automatically provided, including the detailed item pricing. Tax is automatically calculated and applied when applicable.
The customer has now been billed, and invoice waiting payment.
This integrated process streamlines the process and eliminates invoice entry errors.
[Click: Invoice Image]
% Prior to your demonstration, add the Sales Order Number to the Line Information and shrink the columns so it is displayed on initial access.

The invoice image is visible directly from the transaction, allowing me to see what the customer sees!
[Sign In as Customer Service Rep or Order Manager, else open second browser session]

We will return to the role of a Sales Specialist, and validate the order status.
The Receivables department has processed the invoice.
In Order Management Cloud, I can verify the order status has progressed from the invoice created in integrated ERP Cloud.
[Click: Order Management]

Quick Search allows me easy access to orders.
[Enter: Sales Order Number]
[Click: Search Icon]

In Order Management Cloud, the customer order status is now updated to Closed.
[Click: Actions]

Using the fulfillment view, I can validate all tasks have been completed.
[Click: Actions>Fulfillment View]

[Click: Fulfillment Lines]

The order line is also Closed.
[Click: Orchestration Process]

All tasks for this Order have been executed and the Status is Billed.
We showed complete Order to Cash for a product drop shipped from a contracted supplier directly to the customer. The integration solution from order capture, to fulfillment and on to receivables – all in the Cloud. Built in analytics help Sales Specialist be more productive and tight integration eliminates redundancies and reduces errors from order capture to invoicing. Supplier interactions and continuous visibility of order status, allows excellent customer experience to be achieved.